
Simple No Knead Artisan Bread
This delicious artisan bread recipe comes together in less than 5 minutes of active work. It’s the baked to perfection in a cast iron Dutch Oven. If you’re looking for the perfect crusty bread, this is for you!

This simple no knead bread is a great little recipe to have in your back pocket. I used to sell this bread at our local farmers market before I really got into my sourdough rhythm and people would actually think it was sourdough!
While this is a yeast recipe, there is a very small amount and a long, overnight rise. This process does allow for some fermentation to happen, giving this loaf a great flavor! No sourdough starter to worry about, great flavor, no knead, that’s a win win win!
Let’s Get Started!
All you need for this recipe is flour, yeast, salt, and water. Some of the best foods are made with such simple ingredients aren’t they!?
Start by adding 3 cups of flour to a large bowl. Next, add 1 Tablespoon of salt and 1/4tsp of active dry yeast. Then stir in 1.5 cups of luke warm water until you have a shaggy dough. There should be no dry spots, but it will be a very wet looking, lumpy dough.
Now, cover the bowl with some plastic wrap and allow to rise at room temperature for 8-12 hours. I like to start this at night so that in the morning, it’s ready to bake and we have fresh bread for the day with very little effort!
Once the 8-12 hours has passed, you’ll see a very bubbly dough! Keep in mind this is still a very wet dough. The less you touch it the better! We want to keep those awesome bubbles that will create the beautiful little air pockets so true to artisan bread.
When it’s time to bake, place a cast iron Dutch Oven inside your oven and pre-heat to 450. Prepare a piece of parchment paper by giving it a liberal sprinkle of flour. Next, very carefully scrape your dough out of the bowl into the middle of your floured sheet. Do this VERY gently, trying not to deflate all the air that's built up inside the dough.
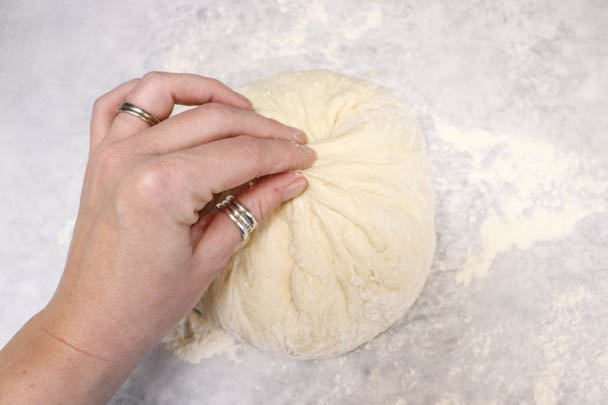
Finally, form a rustic round loaf by pulling sections of the dough towards the top/center from all sides, pinching them together in the middle as you go. See Below. This will take about 5 or six pulls and pinches to get it into a nice round loaf but it definitely doesn’t need to be perfect. The top of the loaf will turn out rustic and beautiful no matter how you pull it together!
Once the oven has pre-heated, carefully pull out your Dutch Oven, pick up the loaf using the parchment paper and gently set the loaf with the paper inside the pot. Place the lid back on and bake in your pre-heated oven for 30 minutes with the lid on and 30 more minutes with the lid off.
Once baked, remove the loaf using the parchment paper and allow to cool for at least an hour before slicing for best results. But… let’s be honest, who doesn’t love a hot slice of bread straight out of the oven!
Why a Dutch Oven
I love baking many of my artisan breads inside an enameled cast iron Dutch Oven. Baking in a hot, covered Dutch Oven for the first 30 minutes, creates a steamy environment for your loaf to beautifully expand in! Many professional bread ovens have a steam feature that creates this wonderfully humid air that allows the bread to rise really well. The steam prevents the bread from getting too dry and crusting over before it has had enough time to expand to its full potential. This steamy environment also creates a really nice crusty crackly crust once the lid is removed and the bread is allowed to brown up.
Another reason cast iron is great for baking is the fact that it’s a great conductor of heat! it holds heat really evenly for a beautifully baked loaf. Depending on your oven, you may notice that the bottom of your loaves are getting a little dark for your liking. I find that placing a sheet pan on the rack below my Dutch Oven helps a lot with this!
I also love roasting chicken and cooking soups and stews in my Dutch Oven. I even love boiling eggs in it! it’s a great tool to have in your kitchen! Here is an affordable one that I’d recommend.
Can I Score this Simple No Knead Artisan Bread?
Yes! You could create a fancy scored loaf using this recipe. To achieve this, after the 8-12 hour rise, place the dough directly into a well floured banneton basket (or a medium sized bowl lined with a tea towel, also floured really well). Then, cover it and place the whole thing into the fridge for 4-24 hours.
When you’re ready to bake, continue with the same steps as above. Dump the dough carefully onto your floured parchment paper and it should look nice and smooth on the top. Now, you’re free to score the dough with whatever design you choose! You can use a razor blade or a very sharp knife for scoring.
If your dough seems to stick and not want to pop out of the bowl or basket well, try dusting your basket with rice flour instead of all purpose. Rice flour doesn’t adhere to the dough like an all purpose would and is really nice for dusting proofing vessels for that reason!

Thanks for spending some time at our Crowded Table! I hope you’ll try out this Simple No Knead Artisan Bread!
If you do, I’d love it if you’d leave a comment and tell me how it turned out